Sunday, October 30, 2011

The Thoracic Cage: Halloween Skeletons Never Get It Right

Unfortunately my anterior leg photos turned out fuzzy, and I have no choice but to re-shoot them. While my exhausted camera recharged, however, I took the opportunity to finish putting up our Halloween decorations. This time of year is fun for everyone, isn't it? Kids get to trick-or-treat, parents get to see their young ones in adorable costumes, surly teens get to T.P. houses, and anatomy instructors get to giggle at all the bad skeleton decorations. That's right, giggle, my friends. You know, while I don't expect a $3.99 cardboard skeleton to be a paragon of anatomical accuracy, I do find myself wondering one thing every year: Why can't the Halloween skeleton artists ever give put in enough ribs?


Not only does this guy have only eleven ribs, but his elbow joints are clearly dislocated bilaterally. He might even have two radii his left forearm. In addition, each femur appears to be articulating with an obturator foramen instead of an acetabulum. Now that's spooky!


So, just to set things straight (for me, if for no one else) and as an extra special Halloween treat (yes, I do know how to party) let's review the thoracic cage and its surface landmarks!

The thoracic cage (a.k.a. rib cage) is part of the axial skeleton, whose purpose it is to provide protection of the vital organs. Each part of the axial skeleton has its own organ protection assignment; the skull protects the brain, the vertebrae protect the spinal cord (and also offer some abdominal organ protection posteriorly) and the thoracic cage protects the heart and lungs. Thoracic cage is a more accurate term than rib cage because this structure is more than just ribs; the thoracic cage is made up of ribs, the sternum, costal cartilage, and thoracic vertebrae.

The thoracic cage is wider laterally and flatter front-to-back. The uppermost ribs are very small and can't be seen on the surface of the body. As we descend to lower ribs, the thorax becomes wider; its widest point is right around the 8th rib. Then it narrows slightly again and the anterior side ends at the wide thoracic arch. While rib pairs three through six or seven come closer to the surface of the body, they don't typically show anteriorly because they're usually obscured by the pectoralis major muscle, which can be fairly thick. Ribs eight through ten are more likely to show on the anterior surface of the body, however, because they're covered by much thinner muscles, including external oblique.


It's a common misconception that the expansion and contraction of the lungs is what moves the ribs. On the contrary, it's the expansion and contraction of the ribs that fill and empty the lungs! The ribs move as a unit to facilitate respiration. As they lift and spread, the lungs fill with air. As they lower and compress, the lungs release air. The ribs can move like this because they articulate with other bones anteriorly and posteriorly with slightly moveable joints.

The Ribs
There are twelve pairs of ribs in the human thorax, and they are numbered from the top down. Each pair of ribs articulates posteriorly with a thoracic vertrebra (which are given that name because of their role as part of of the thorax.) This is why we have twelve thoracic vertebrae and twelve pairs of ribs. The joints at which the ribs articulate with vertebrae are called costovertebral joints. (costa is Latin for rib.) On the anterior side, however, only the first seven ribs articulate directly with the sternum, at joints known as costosternal joints. The seven ribs that articulate directly with the sternum are known as true ribs. The rest are known as false ribs. Ribs 11 and 12 are also known as floating ribs, because they don't articulate with any structure anteriorly.

The Sternum
Sometimes referred to as the breastbone, the sternum runs down the anterior midline of the thorax. It is made up of three separate pieces fused together at immovable joints. These pieces are named for their similarity to a sword. The most superior portion of the sternum is called the manubrium. This word is Latin for "handle," as this was evidently visualized as the handle of this sword shaped structure. The middle piece of the sternum, the body, is the largest portion of the sternum. Finally, the xiphoid process is the small bone at the inferior end of the sternum. Xiphoid comes from the Greek xiphoeides, which means swordlike. The xiphoid process may be either bony or cartilaginous in the adult human, and it often ossifies later than the rest of the bony skeleton.

Costal Cartilage
Shown in blue in the illustration above, the costal cartilage makes up the medial portion of the ribs on their anterior side. The costal cartilage makes this area of the thoracic cage more flexible. The thoracic arch, a surface landmark of the rib cage, is made up entirely of costal cartilage.

Thoracic Vertebrae
Running down the posterior midline of the thorax, the twelve thoracic vertebrae are considered both part of the spinal column and part of the thoracic cage. They are the only vertebrae with costal facets (flat articulation points for ribs) which makes sense, since no other types of vertebrae articulate with ribs.

Surface Landmarks
Several areas of the thoracic came form landmarks on the body's surface. How clearly they show depends on the amount of overlying tissue (either muscle or adipose) and the position of the body. Of all the thoracic surface landmarks, the jugular notch (a.k.a. suprasternal notch) is probably the easiest to see.


This figure study by American Academy of Art graduate Jacob Sanders shows a fine example of proper placement of the jugular notch. It is centrally located on the anterior neck, and often, on either side of it, we can see the knobby medial ends of the clavicles and the manubrial attachments of the sternocleidomastoid muscle. For more detailed information about this area, see The Anterior Neck: Theme and Variations.

Another typically visible thoracic surface landmark is the thoracic arch, a peaked arch of costal cartilage at the lower edge of the anterior thorax. This arch defines the superior border of the abdomen; it's the ridge where the bony thorax ends and the soft tissue of the abdomen begins. Its degree visibility depends on the amount of adipose tissue covering it, the thickkness of the muscles, and the position of the body. It will show more, of course, of the abdominal muscles are pulled in or if the rib cage is expanded due to inhalation. The thoracic arch also shows more clearly if the arms are held over the head or if the figure is lying supine.

Here is one of Jacob's illustrations in which we can see the thoracic arch:


One of the reasons Jacob figure work is so nice is that he, like Adam Nowak in a previous post, pays such close attention to anatomical detail. Here is a close up of the figure with the thoracic arch identified:


The position of the arms above the head is what make the arch more visible. We can also see some of the ribs in this image. Note that it's the first three false ribs (ribs 8 through 10) that show most. They're covered by the external oblique, a much thinner muscle than pectoralis major above, which usually obscures the true ribs.

Sometimes the ribs are also visible from a posterior view, as the back muscles covering them (trapezius and latissimus dorsi, for the most part) are relatively thin. Another of Jacob's illustrations demonstrates this. No need to even point out the ribs here. They're very clear:


Both of the flyers shown above are for Jacob's brother's band, Casket Showroom. Check them out! And again, to see more of Jacob's work, you can view his web site or his blog. Thanks for letting me use your work Jacob!

One last thoracic surface landmark is the sternal angle of Louis, which is a ridge at the level of the second rib, where the manubrium and body of the sternum meet. This landmark is usually only seen in very thin individuals--with low cut dresses! So maybe I'll cover this landmark the next time the Emmy Awards or the Oscars are aired.

Happy Halloween, everyone. Another leg post is on deck.

Friday, October 14, 2011

The Lateral Knee: A Change of Scenery

Hello! It's a lovely fall day here in Chicago, and another refreshing midwest change of scenery is upon us. While I love all the city offers during the warm summer months, the change of seasons is always welcome; too much of the same thing can get a little stale. This has me thinking that I could use a break from writing about upper extremity (as I'm sure you could use a break from reading about it.) As beautiful as the arm is, and as much as there is to learn about its structure, I think this week might be the perfect time for an anatomical change of scenery. Grab yourself a hot mug of apple cider and let's talk about the leg!

Recent news photos from a perennial fall event, the Chicago Marathon, got me thinking about an area of the leg I've been wanting to write about. On the lateral side of the knee, we can see two incredibly beautiful tendons whose surface appearance increases in clarity when weight is placed on the leg. So it's easy to see these tendons, as well as some surrounding muscles, on runners.

Let's start with a photo showing a lateral view of a runner's knee. Once you've recovered from the shock of this gentleman's extremely short shorts, you'll notice that two tendons show very clearly where the thigh reaches the knee. What we're seeing here are the insertions of the iliotibial band and the biceps femoris tendon.

While the thigh is heavy with strong muscles that completely obscure most of the femur, its lateral-most surface is covered with a wide tendinous sheath known as the iliotibial band. Just deep and posterior to that, we find the biceps femoris muscle, one of the flexor muscles on the posterior surface of the thigh.


The pronounced landmark tendons in the photo above stem off these two structures. The biceps femoris tendon is an insertion tendon that comes from, of course, the more proximal biceps femoris muscle. This tendon is posterior to the iliotibial band tendon, and it inserts onto the head of the fibula, just distal to the knee joint. The iliotibial band tendon comes from the iliotibial band above and it inserts onto the lateral side of the tibial head. These two tendons, when they protrude (most visibly on a weight-bearing leg) form a beautiful little fossa just proximal to the lateral knee. (In anatomical terminology, a fossa is a depression; the word fossa comes for the Latin for ditch.)

These two tendons are usually visible, but to varying degrees, as we'll see below. But first let's examine the anatomy more closely:


Let's first establish that this is a lateral view of the knee and lower leg. The fact that digit number 5 (the pinky toe) is closest to us makes this clear up front. But if we could not see the foot, we'd still know this was a lateral view because we can see both ends of the fibula (the head at the proximal end and the lateral malleolus at the distal end.) In addition, if we were viewing the medial side of the lower leg, we'd be able to see the entire length of the medial tibia, which is not obscured by any soft tissue. 

On the lateral knee we can see the two tendons that show in the runner photo above. The iliotibial band tendon comes from an eponymous band above. This band originates at the tensor fasciae latae muscle at the ilium (a pelvic bone), and it inserts onto the tibia, hence the name ilio-tibial band. We can also see that this band inserts onto the tibia just posterior to the patella.

The other visible tendon here is that of the biceps femoris muscle. It can be seen in this diagram just posterior to the iliotibial band. This tendons extends more distally than that of the iliotibial band because it inserts onto the head of the fibula. This feature of the fibula is a very nice orientation landmark because not only is it the insertion point for biceps femoris, but it's also the origin point for a lower leg muscle, peroneus longus. (Peroneus longus is briefly touched upon in a previous post, A Lateral Ankle Tendon: Peroneus Longus or Peroneus Brevis?)

We can see in the photo above, as well as the photo below, how a weight-bearing leg shows these tendons so clearly:


We can see here that the iliotibial band tendon is more anterior than the biceps femoris tendon, and it doesn't extend as far distally. Also, the iliotibial band tendon is wider and flatter than the more cylindricl biceps femoris tendon. Notice also how the biceps femoris tendon forms the lateral wall of the popliteal fossa, which is the hollow area on the back of the knee.

These tendons are still visible on a relaxed leg but in a different way. A painting below by my talented friend Adam Nowak shows this. First let's look at the full painting:


The model's right leg is relaxing over the left leg, and we can still see the lateral knee structures mentioned above. But here the iliotibial band reads as a sunken area because just anterior to it (or above, in this image) the relaxed vastus lateralis muscle is sort of bulging out over the iliotibial band, casting a shadow over it. Posterior to the iliotibial band (or below it, in this image) the biceps femoris muscle also bulges out as it's pressed against the right leg. The band itself, being of less flexible tissue, maintains its shape and reads as a flat crease.

Here is a close-up:


Notice the iliotibial band in the model's relaxed right leg reads as more of a long depression than a ridge, and the vastus lateralis muscle, although not contracted, bulges outward as its weight makes it sort of spill over the iliotibial band. The painter pays close attention to anatomical detail, and it shows here. You can see more of Adam's beautiful work at Adam Nowak's Art Blog.

I do miss summer a little bit, and I could spend another long stretch of warm weather hunched in front of my computer with a glass of iced tea, writing more about the arms. But a change of seasons is good, as is a change of scenery. There is much more to cover on the human leg, so let's stick around awhile and absorb the view. Another post will be up soon, possibly the anterior thigh or lower leg. Thanks to Adam for the use of his image! Until next time, my friends.

Saturday, September 24, 2011

The Dorsal Forearm: One Last Encore

I wasn't going to include these mini posts on the blog itself, but I kind of like this one, so here we go. We covered the dorsal forearm pretty thoroughly over the summer, but coming across this photo made me think maybe a quick encore was in order. Some of the muscles show pretty clearly here, so I slapped on some quick labels.


In the photo above, we can see the three most commonly visible dorsal forearm muscles, anconeus, extensor carpi ulnaris, and extensor digitorum. We can also see the lateral epicondyle of the humerus (the bony protuberance from which all these muscles originate) and the tendons of the extensor digitorum heading across the back of the hand to their insertion points on fingers II through V.

Compare the original photo to the labeled photo to get an idea of how clearly these structures can show, as well as where they appear and disappear. And don't forget that other variables (such as arm and hand position, age of the individual, and light source) will affect the surface appearance of these structures.

For more detailed description of this area, check out a previous post, The Dorsal Forearm, Part 2: Which Side Are You On, Anyway?

Some leg posts are coming up soon!

Wednesday, September 21, 2011

A Lateral Ankle Tendon: Peroneus Longus or Peroneus Brevis?

Hello! Just a quick post today to give you a taste of the extra anatomy information you can now get at the new Human Anatomy for the Artist Facebook page! Yep, I have a Facebook page now, on which I'll post links to all the full lessons that are normally seen on this blog, as well as other links, photos, book recommendations, and quick mini-lessons like the one below.

This will allow those who don't use Blogger (and those who use Blogger but don't check it often) to get updates on a more regular basis. The Blogger posts, after today, will resume their usual format of longer, more elaborate lessons.

So... today's mini-lesson is about a tendon seen on the lateral ankle and foot. Or is it two tendons? Let's take a look:


When drawing the lateral side of the foot, you'll almost always see a tendon up above (proximal to) the lateral malleolus of the fibula, which is a bony bump on the lateral side of the ankle. Sometimes, though, when the foot is everted (sole turned outward) and/or plantarflexed (toes pointed downward) you'll see what appears to be a continuation of that tendon down below (or distal to) the lateral malleolus. The whole thing really looks like one long tendon wrapping around the back of the malleolus. But... you guessed it. It's not!

What we're seeing here is actually two different tendons. The tendons of both the peroneus longus muscle and the peroneus brevis muscle wrap around the back of the lateral malleolus, but here's the weird thing. The peroneus longus tendon disappears right around the time it reaches the lateral malleolus. At that point, the peroneus brevis tendon emerges and continues its course along the lateral side of the foot. But the transition is so smooth that it looks like a single tendon both proximal to and distal to the lateral malleolus.

In drawing, the difference is that you'll almost always see the peroneus longus tendon, but the peroneus brevis tendon will usually only show when the foot is everted or plantarflexed.

One more thing: Some books call the peroneus longus and brevis tendons by a different name: fibularis longus and brevis. So if you see this, it isn't wrong. It's just an alternate name. Sometimes that happens in Anatomy. I guess it keeps things interesting.

We'll have a more detailed lateral leg post, complete with diagrams, soon!

Sunday, September 11, 2011

The Dorsal Forearm, Part 3: The Final Chapter

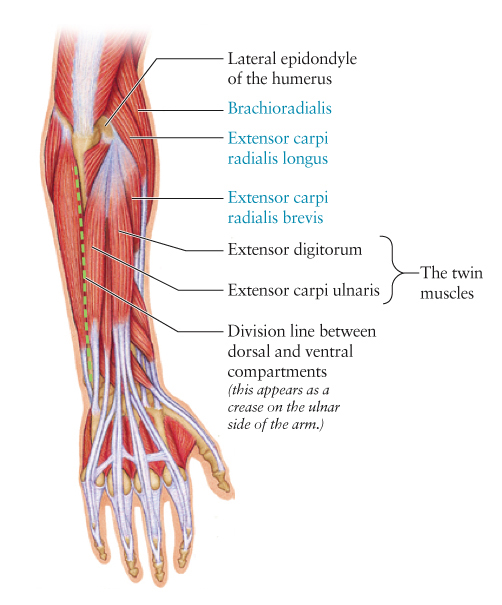
Hello, and welcome back! I am happy to say we will finally finish up the dorsal forearm today. Who knew such a small area of the body would require so many posts? We began with Dorsal Forearm: Compartment Search, in which we learned to identify the two compartments of the forearm-- an important first step in becoming oriented in such a complex muscular landscape. Then we learned about dorsal forearm muscles that are closer to the ulnar (pinky) side of the forearm in Dorsal Forearm: Which Side Are You On Anyway? As those muscles are easiest to identify, it was best we covered them first and then use them to find the remaining forearm muscles, which we'll cover today.

By the way, if you are interested in reading about the less complex tendinous landmarks of the ventral forearm, check out the very first post, The Ventral Forearm: What are those Tendons?

So. When we last left off in our forearm saga, we were looking at, among other structures, the "twin muscles," two muscles that look very much alike and run directly down the dorsal side of the forearm. Their similarity to one another as well as their central location on the dorsal forearm make them among the easiest to identify in this area.

The last three muscles we'll cover on the dorsal forearm can be found just radial to the twins-- meaning closer to the thumb side of the arm compared to the centrally located twins. It's no coincidence that each of these three muscles have the root "radial" in their names. As well as indicating that these muscles are found on the radial side of the arm, this root also tells us that these muscles pull the hand toward that side. This movement is known as abduction of the hand. Hence the fact that radial side arm muscles tend to abduct.


The three muscles we'll be looking for today are labeled in blue on this diagram. Notice that they are closest to the radial (thumb) side of the hand. And notice that all their names have "radial" somewhere in the name. 

Of these muscles, the most radial is brachioradialis. This muscle starts way up on the upper arm (or brachium, hence the root brachio in its name) and travels distally, along the radius, towards its insertion on the styloid process of the radius (a bump at its distal end.) This muscle, despite its certified membership in the dorsal forearm compartment, can actually be seen more clearly from the ventral side. So we won't see much of it today in our photographs.

Running right between brachioradialis and  extensor digitorum (one of the twin muscles) we see two muscles with very similar names: extensor carpi radialis longus and extensor carpi radialis brevis. Can you guess, by looking at these names, what these muscles have in common and what they don't?

Let's look at their names: Both names contain extensor carpi radialis, which means extensor of the wrist (carpi) on the radial side of the arm (radialis.) So these are attributes of both muscles. But how do we distinguish them from one another? The qualifiers tacked on to the end of each name tell us! Yes! One of these muscles is longer than the other. Extensor carpi radialis longus is the longer of the two, and extensor carpi radialis brevis is the shorter. (Brevis is Latin for short, or brief.) Knowing this, you should be able to tell one of these muscles from the other, as one is clearly longer than the other. In addition, it's helpful to know that extensor carpi radialis brevis lies right next to extensor digitorum and it tends to sink in rather than stand out when the dorsal forearm muscles show on the surface of the body.

Extensor carpi radialis longus is sometimes identified by its unique shape. It originates just proximal to the lateral epicondyle of the humerus, higher up on the arm than the origin points of the twin muscles. Also, unlike the twin muscles, extensor carpi radialis longus take a sharp turn where its muscle body meets its long insertion tendon. So its muscle body (which is its most visible part on the surface of the body) appears at an oblique angle on the upper dorsal-radial forearm. This is the only dorsal forearm muscle that lies at such an angle.


Key: Tlat: triceps, lateral head; Tten: triceps tendon; BrR: brachioradialis; ECRL: extensor carpi radialis longus; ECRB: extensor carpi radialis brevis; LE: lateral epicondyle; Anc: anconeus; OP: olecranon process; ED: extensor digitorum; EDM: extensor digiti minimi; ECU: extensor carpi ulnaris; FCU: flexor carpi ulnaris; APL: abductor pollucis longus; EPB: extensor pollucis brevis; EPL: extensor pollucis longus

The photo above shows a dorsal forearm and an abducted hand. Because radial side muscles abduct the hand, they will stand out more in this position than in any other. The easiest one to spot is extensor carpi radialis longus, as it stands out clearly right next to the lateral epicondyle. Notice its oblique course compared to the surrounding dorsal forearm muscles. Notice also that it and brachioradialis originate on the upper arm (unlike the twin muscles that originate at the lateral epicondyle of the humerus.)

At the distal end of the arm, you may also notice three smaller muscles, abductor pollucis longus, extensor pollucis brevis, and extensor pollucis longus. While these muscles stand out clearly here, they often don't. We will look at them more closely later. You may remember, however, that we have already observed their tendons (which can be seen at the base of the thumb) in the post on the dorsal hand.

I've also pointed out the lateral head of the triceps and the triceps tendon, structures on the posterior upper arm. We will cover these later, but this photo shows them very clearly.

Now let's take a look at this arm without the structure overlay:


Notice the most obvious radial side muscle is extensor carpi radialis longus. It bulges out more than its counterpart, extensor carpi radialis brevis. Brachioradialis does show fairly well on the surface, but as pointed out earlier, it actually shows more clearly on the ventral side of the forearm. Brachioradialis is one of the dorsal forearm muscles that can't decide which side it wants to be on; although it's technically in the dorsal compartment, it tends to peek around to the ventral compartment, and although it technically belongs to the extensor muscle group, it does facilitate some flexion of the wrist as well. In any case, we don't see it very clearly on the dorsal side of the arm, nor to we see extensor carpi radialis brevis very clearly (other than in an exceptionally defined individual.) As such, if the hand is abducted, the muscle we want to look for (and to be sure to draw!) is extensor carpi radialis longus.

So let's look for this muscle in a few more images...


In the photo above, we can see three structures very clearly. (Well, four, if you count the extensor digitorum tendons on the back of the hand.) We can see extensor digitorum (the more radial of the twin muscles), the lateral epicondyle of the humerus, and the extensor carpi radialis longus muscle. Notice again how ECRL runs more obliquely than its neighboring muscles and how it originates higher up on the arm than the twin muscles.


The extensor carpi radialis longus muscle is softer in this photo but still visible because the hand is abducted. We can also see the lateral epicondyle, anconeus, and both extensor digitorum and extensor carpi ulnaris. The degree to which the dorsal forearm structures are visible on the surface of the depends on several variables. These include but aren't necessarily limited to: the tone of the muscles, the amount adipose tissue overlying the muscles, the position of the arm and the degree of muscle contraction, the age of the individual (as it relates to skin thickness) and even the light source and the amount of contrast in the values of the structure.

Well, we've covered just about everything we can on the dorsal forearm, with the exception of the radial thumb muscles. Perhaps that can be our epilogue? But I'm going to put the forearm aside for awhile and move on to something different. I'm thinking maybe the posterior torso muscles or something with the thigh. We'll see. As always, suggestions are welcome!

Thanks to my forearm models, Christian, Jessica, and Jeff. I couldn't write this blog without your willingness to stand around and do funny poses for me.

Wednesday, August 17, 2011

How To Clean an Animal Skeleton

OK, I lied. I'm not posting the exciting conclusion of The Dorsal Forearm today. While I realize Part 2 left you with some massive cliffhangers (Are there really two extensor carpi radialis muscles?) you're just going to have to wait. Because I've once again been sidetracked while cleaning and organizing my home office. My last post on anatomical terminology was inspired by an old illustration; this post, my friends, is inspired by my growing collection of animal bones.

Over the years I've found quite a few partial animal skeletons in my garden, and several friends have been kind enough to give me any ossified treasures found on their property. I have mostly raccoons and possums, plus a few very delicate bird skulls. Having spent so much time learning about, drawing, and teaching classes about the human skeleton, I find it an interesting change of pace to observe these animal structures, in particular those of mammals, to look for features analogous to those of the human skeleton.

Before the bones are added to my collection, though, they need to be cleaned. Over the years I've come up with a pretty good method, and I thought I'd share it here, for any other anatomy lovers out there who want to hang on to a found skull or skeleton.


These are the skeletal remains of a possum I found recently. There is a partial skull, the ilia (which are
part of the pelvis) and two vertebrae. I mislabeled them, though. I think they are probably caudal
vertebrae, which are those in the tail.

So, here is the process I've been using for cleaning animal bones:

1) Have roommates who don't mind finding animal bones soaking in the sink.

2) Let the bones sit out in the sun long enough so any remaining particles of flesh are completely dried out. (It may already be at that stage when you find it!)

3) Gently break off as much of the flesh and fur that you can without damaging the bones.

4) Soak the bones in a bucket of soapy water overnight.

5) Use a soft toothbrush and a little soap to very gently scrub the bones. Then rinse them thoroughly.

6) Soak the bones overnight again, but this time in warm water with about 1/4 cup of bleach added to it.

7) Rinse the bones thoroughly.

8) Lay the bones on a towel and let them dry thoroughly. Letting them sit in the sun will speed up this process.


So there you go. Thanks to Dana for providing the skull above (I think?) Donated bones are welcome to my collection at any time! See you next time for another forearm post.


Monday, August 15, 2011

The Lovely Language of Anatomy and Medicine

The art students to whom I teach anatomy often cringe at the idea of learning structure names. "Why?" they implore, "Why do we need to know the names if all we're doing is drawing them?"

My goal is to show them that in order to discuss the structures that define the human body's shape, we have to have the language for it. We could simply point to different structures and call them "this one" and "this one" and this other one," but it wouldn't mean anything. It wouldn't stick.

And while it's true that my students will very likely forget many names of muscles and bones within a few months after completing my course (you know it's true!) I still believe that the fact that they once knew the names, that they once had to burn the impression of that name in their brain, will mean they'll never forget the structure itself. This may not be the most pleasant analogy, but it's sort of like learning the names of the structures is the actual wound, and remembering the structure and what it looks like is the scar. You need to go a little overboard initially in order to leave a lasting impression.

And aside from all that, I love the practicality of anatomical and medical terms. I mean, they're so descriptive! For example, take the muscle name extensor carpi radialis longus. It tells you just about everything you need to know! It's an extensor (extensor). It extends the wrist (carpi.) It's on the radial side of the forearm (radialis) which means it tends to pull the wrist in that direction as well. And finally, it is the longer of two similar muscles (longus.) By the way, its partner is known as extensor carpi radialis brevis; brevis means short, or brief.

There are many words in anatomical terminology that describe a muscle's function. Here are some examples:

- extensor (extends, or increases the angle of a joint) 
- flexor (flexes, or decreases the angle of a joint) 
- abductor (abducts, or pulls a structure away from the midline of the body) 
- adductor (adducts, or pulls a structure toward the midline of the body)
- tensor (tenses, as in tensor fasciae latae, a muscle that tenses the iliotibial band.)
- arrector (erects something, as in the arrector pili muscles, tiny muscles in the hair follicles which make hairs stand erect and give us goose bumps.)


There are also anatomical terms that describe different areas of the body, such as:

- cranial: having to do with the cranium (as in cranial nerves, cranial arteries, epicranius muscle)
- cervical: having to do with the neck (as in cervical vertebrae, those found in the neck)
- thoracic: having to do with the thorax (as in thoracic vertebrae, those attached to ribs)
- costal: having to do with ribs (as in costal cartilage or intercostal muscles)
- abdominal: having to do with the abdomen (as in the abdominal aorta or the rectus abdominis muscle)
- lumbar: having to do with the lower back (as in lumbar vertebrae, those found in the lower back)
- femoral: having to do with the thigh (as in the rectus femoris muscle, or the femoral artery)
- brachii: having to do with the upper arm (as in the biceps brachii muscles, or the brachialis muscle)
- carpi (wrist; as in extensor carpi ulnaris muscle, or the carpal bones)
- digitorum (fingers or toes; as in extensor digitorum longus muscle in the lower leg, which extends the toes)
- digiti minimi (small finger; as in extensor digiti minimi muscle in the forearm, which extends the little finger)
- pollicis (thumb; as in the many muscles that move the thumb: extensor pollicis longus and brevis, abductor pollicis longus and brevis, flexor pollicis longus and brevis)
- hallicus (big toe; as in extensor hallicus longus, the muscles that extends the big toe)

You'll notice some of the names of aforementioned structures included the term rectus, which brings me to anatomical terms which describe direction and shape:

- rectus: running straight up and down, as in rectus abdominis muscle and rectus femoris muscle.
- oblique: running at an oblique angle, as in external obliques and internal obliques.
- transversus: running transversely or side-to-side, as in the transversus abdominis muscle.
- deltoid: shaped like a Greek delta (triangular) 
- quadratus: four sided, as in the quadratus labii inferioris muscle (four-side muscles inferior to the lower lip) or the pronator quadratus muscle (a four sided muscle deep in the forearm that helps pronate it.)
- serratus: jagged or serrated in shape, such as the serratus anterior muscle.
- trapezius: Muscle on the back that is trapezoid in shape.
- rhomboids: As in rhomboid major and minor, muscles on the back that are shaped like rhombuses. Or is it rhombi?

Some more odd examples of structures named for shape are:

- gastrocnemius: belly shaped
- soleus: fish shaped (and some say this means sandal shaped.)

By now you'll have also noticed many muscle names that describe relativity between two similar muscles:

- longus, brevis (longer and shorter versions of similar muscles, such as extensor pollicis longus and extensor pollicis brevis.)
- maximus, medius, minimus (large medium and small versions of similar muscles, such as gluteus maximus, gluteus medius and gluteus minimus.)
- superficialis, profundus (superficial and deep versions of similar muscles, such as flexor digitorum superficialis and flexor digitorum profundus.)

There are also some pretty cool roots for different internal areas of the body, such as:

- gastro- stomach
- hepato- liver (as in hepatitis, which is inflammation of the liver, or hepatocyte, which is a liver cell.)
- arthro- joint (as in arthritis, which is inflammation of the joints)
- renal: related to the kidney (as in renal artery, or renal calculi, which are kidney stones)
- spondylo- spine (as in spondylitis, which is inflammation of the spine.)
- cardio- heart (as in cardiac muscle)
- pulmo- lungs (as in pulmonary arteries)
- cyto- cells (as in cytology-- the study of cells, or hepatocyte, which is a liver cell.)
- dermo- skin (as in dermatology, the study of skin, or epidermis, which is the outer layer of skin.)


Illustration of gallstones or cholecystolithiasis. Chole = bile; cysto = sac; litho = stones; iasis = process.  Cholecystolithiasis is the process by which stones are formed in the gallbladder, which is basically a sac of bile.

The last example of a beautiful and practical medical term brings us back to the image I found today. It illustrates gallstones, or cholecystolithiasis, whose name can be broken down like this: Chole- means bile; cysto- means sac; litho- means stone; iasis means process. Soooo... cholecystolithiasis is: The process by which stones collect in the gallbladder (which is essentially a sac of bile.) 

Ah, well I've gotten that out of my system. Until next time, anatomy lovers. I promise we will return to Part 3 of the forearm then!