Tuesday, July 19, 2011

The Dorsal Forearm, Part 1: Compartment Search

While I'm very happy to get to the first dorsal forearm post, let me first apologize for the long hiatus I've inadvertently taken. In addition to teaching at the American Academy of Art, I am also on the part time faculty at the Biomedical Visualization program at the University of Illinois at Chicago, a fabulous graduate program for future medical illustrators, animators, and anaplastologists. Although it's kept me from my blog for the past few weeks, I've very much enjoyed reading and editing many compelling research papers that this year's graduating BVIS students are finishing up. I can't give away their content, but let's just say it's amazing to see what can be done with MRI data and 3D modeling and animation applications!

The dorsal forearm is one of my favorite lectures, as its intricate and complex musculature is unmatched anywhere else in the body. At the Academy, we devote three entire classes to just the forearm; it deserves a slow and thorough explanation. I can't fit even the dorsal side into one post here, so I'll be dividing it up into a few.

Muscles in the limbs are categorized into groups (which are defined by function) that reside in muscle compartments (which are defined by location.) The forearm has two muscle compartments, the dorsal compartment (in which the extensor/supinator muscle group resides) and the ventral compartment (in which the flexor/pronator muscle group resides.) I wish I could say the dorsal and ventral compartments were placed perfectly dorsally and ventrally on the arm, but alas, they are not. Each spills over onto the other side a bit. This means while most extensor/supinators are seen on the dorsal side of the arm, a few can be seen peeking over onto the ventral side, and while most flexor/pronators are seen on the vental side of the arm, a few can be seen peeking over onto the dorsal side. 

Have I lost you yet? Agh, I know this verbal explanation is really dry, so lets try a diagram. Click for an enlarged view if necessary!


Above we see dorsal (top side) and ventral (underside) views of the right forearm. We also see the location of the extensor/supinator muscle group (shown in blue) and the flexor/pronator muscle group (shown in green.) Notice how we see mostly extensor/supinators on the dorsal side, but a few flexor/pronators creep over there. Similarly, we see mostly flexor/pronators on the ventral side, but a few extensor/supinators creep over there. It's like they each know where their home is, but they can't resist peeking around to the other side.

Since the two forearm muscle groups are not clearly divided between the ventral and dorsal sides, we use other landmarks to find their borders. On the dorsal side of the arm, the crest of the ulna (the distal end of the bone that can be seen and felt on the surface of the arm) is the border between the two muscle groups. On the ventral side, the biceps brachii tendon (coming from the biceps brachii muscle on the anterior upper arm) is the border between the two muscle groups.

When observing the muscles of the forearm, the best way to become oriented is to first figure out where the two muscle groups (and the borders between them) are. As such, when observing the dorsal forearm, the first structure we want to identify is the ulnar crest. This actually doesn't look like much on the surface, but it's easy to find A) because we can usually feel it, and B) because it merges with a nice little furrow at its proximal end.


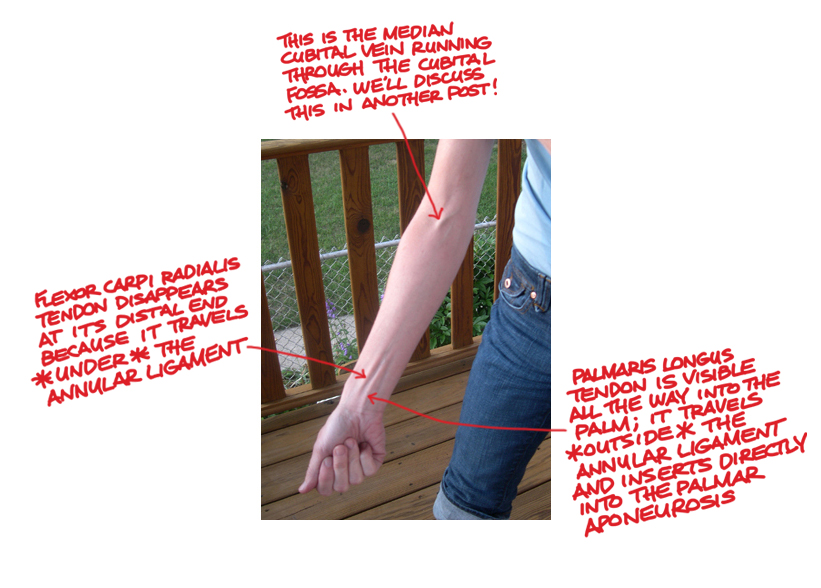
In the above photograph, the arrow is pointing to the crease along the ulnar crest. Everything above this in the photograph is the extensor/supinator group, and everything below this is the flexor/pronator group.


In this photo, the dashed line follows most of the furrow along the ulna distally until we reach the head of the ulna (the little bump on the pinky side of the wrist. The furrow stops suddenly at its proximal end because at that point we run into the anconeus muscle, a small triangular muscle between the lateral epicondyle of the humerus and the olecranon process of the ulna (what we normally think of as the elbow.)


The area in blue (above the red dashed line) is the extensor/supinator group. The area in green (below the red dashed line) is the flexor/pronator group. Muscles are outlined and labeled:  BRR (brachioradialis); ECRL (extensor carpi radialis longus); ED (extensor digitorum); EDM (extensor digiti minimi); ECU (extensor carpi ulnaris); Anc (anconeus); and FCU (flexor carpi ulnaris) which is the only muscle from the flexor pronator group that can be seen from this view.

In the above image, we can still see the division between the two muscle groups (shown with a red dashed line) but we can also see outlines of muscles within each compartment. Notice how the division line runs right along the ulnar crest and ends distally at the head of the ulna. Notice also how the proximal end of the division line ends at the triangular anconeus muscle.

Now that things are a little more clarified, lets revisit the unembellished arm photo and take another look at the muscles shapes.


So I think that's all we'll cover for today. Keep in mind that these early posts tend to show the body in odd positions because we are still covering straightforward anatomy, and these positions are meant to help pronounce all structures in a given area. Later on we'll observe the arm (and the rest of the body) in more natural poses and note what structures are seen then. 

Dorsal forearm part 2 to come soon! At that point we'll look more closely at the individual muscles and learn to tell them apart. Thanks to my forearm model, Shannen!

Monday, June 27, 2011

The Dorsal Hand: The Dorsal Foot's Better Looking Sibling

Writing about the dorsal foot last time got me thinking about the dorsal hand, which despite its completely different outward appearance, is a pretty close relative structurally. For starters, the bones of the hand sit in a curved arrangement so, like the foot, it's convex on its dorsal side and concave on its palmer side. (The palmar side of the hand is also considered ventral, just like the plantar side of the foot.) Because of this arrangement, most of the soft muscle tissue in the hand is either on the palmar side or tucked between the metacarpals. Most of what we can feel on the dorsal side of the hand is bone, and most of what we can see are tendons (along with a few superficial veins.) Like the dorsal foot, the dorsal hand has seven visible tendons (although we don't always see them all at the same time) and only one clearly visible muscle. And finally, the visible tendons in the dorsal hand, like those in the dorsal foot, are named for the structures onto which they insert and for the movements they facilitate. 


The easiest tendons to identify in the dorsal hand are those of the extensor digitorum muscle. Its name means extensor of the digits, which is why there were also extensor digitorum tendons in the feet. (Toes are digits, too.) But notice the absence of "longus" or "brevis" here; unlike the toes, the fingers have only one extensor muscle, so it needs no further qualifier in its name. The extensor digitorum muscle, which lies in the dorsal forearm, splits off into four individual tendons that insert onto digits II through V (the index finger through the small finger.) The thumb has its own muscles, some of which we'll look at later in this post. It's easy to identify the four extensor digitorum tendons on the dorsal side of the hand because they are clearly heading in the direction of digits II through V. These tendons show most of the time, but more so when the fingers are extended (which means straight as opposed to curled inward) or abducted (which means spread apart.)

The thumb extensors are also pretty easy to spot as well, especially when the thumb is... well... extended. There are two thumb extensors, extensor pollucis longus and extensor pollucis brevis. Pollucis comes from the Greek word pollux. These two tendons are most visible at the base of the hand on the radial (thumb) side. At this point, they rest about one centimeter apart. Of the two, extensor pollucis longus is the more dorsal and, as its name implies, the longer. It inserts all the way on the first distal phalanx. Extensor pollicis brevis is more ventral, and it inserts on the first proximal phalanx. Another tendon, that of abductor pollucis longus, runs right along side the extensor pollucis brevis tendon at this point, but it is difficult to differentiate one from the other. The bodies of all three of these muscles are on the distal end of the forearm, radial side, and you can see them moving around if you extend and abduct your thumb.


Things look a little different on the dorsal hand when we adduct the thumb. Adduction of the thumb is bringing it inward so it tucks up right along the index finger. When we do this, the extensor digitorum tendons are still somewhat visible, but the extensor pollicis longus and brevis tendons disappear almost entirely. And in this position, a whole new structure pops out-- the first dorsal interosseous muscle. Interosseous means "between bones" and these muscles were given that name because they run in between the metacarpals, the bones in the body of the hand. There is a dorsal set of interosseous muscles and a palmar set (which are also between the metacarpals but on the palmar side.) Of all these, the only one that's ever really visible on the surface is the first dorsal interosseous. That means the dorsal interosseous muscle between the first and second metacarpals. When the thumb is adducted, the first dorsal interosseous muscle plumps up like a little pillow just next to the thumb. The more tightly adducted the thumb, the more this muscle shows. At the base of this muscle lies the trapezoid bone, one of the eight small carpal bones at the base of the hand. The trapezoid bone is not always easy to see, but it can be palpated easily.


There are two more elusive tendons on the dorsal hand that can be seen in certain situations. While the extensor digitorum longus muscle extends digits II through V, two fingers on the hand have extensor muscles exclusively their own. The second digit (or digiti indices) has its own private extensor called extensor indices. As you can probably guess, this tendon is most visible when the index finger is extended separately from the others.


The other elusive dorsal hand tendon is that of extensor digiti minimi. This name means "extensor of the small digit" and, you guessed it, it can be seen most clearly when the fifth digit (digiti minimi) is extended separately from the rest. It runs right along side the extensor digitorum tendon heading toward the fifth digit, but the extensor digiti minimi tendon is closer to the ulnar side of the arm.


All this dorsal hand talk has me amped up to write about the dorsal forearm soon. That's the mother of all complex muscular areas, but it's very cool. I've already chosen my forearm models, which was no easy task! I look forward to that and, as always, I'm open to suggestions for other areas to cover.

Tuesday, June 14, 2011

The Dorsal Foot: How Do I Love Thee? Let Me Count Your Tendons

A few weeks ago I had the pleasure of spending the day with 20 of my students at Body Worlds exhibit at the Museum of Science and Industry here in Chicago. It was a great day spent in the company of many wonderful students and friends, and it was unique opportunity to use real human specimens to discuss many of the structures we've covered in anatomy class.

My awesome students: Kris and her sister, Nick, Amanda, Lucas, Bryan, Paul A., Paul H., Matt, Vanessa, Leslie, Hali, Kristen, Jake, Sarah (not a student, but a fellow Anatomy instructor), Nate, Kirsten, Dustin, Aaron  

I have a real soft spot for the human foot-- particularly the dorsal side, where several superficial tendons can be seen just beneath the skin, sweeping gracefully across the convex arrangement of metatarsal and phalanges. So I experienced a particularly intense nerd buzz at Body Worlds when given the opportunity to explain these relationships using an actual human foot. We weren't allowed to touch the foot, but frantically stabbing my finger on the glass case in which it rested seemed to suffice. Talking about these structures while students listened (or pretended to listen) was really a lovely moment for me, so today's post is going to center on the remnants of that discussion.

So... first things first. There just aren't many visible muscles in the foot. There are several on the plantar surface (the bottom--the part that touches the ground) but they are not particularly defined or visible externally. The bones of the foot, especially the metatarsals, lie in a curved arrangement, so the basic structure of the foot is concave on the plantar side, convex on the dorsal (top) side. A few layers of muscles are nestled within the concavity on the plantar side, but they are obscured superficially by the plantar aponeurosis, a thin, flat tendinous covering that helps protect the underside of the foot. We can feel the soft tissue of the muscles through this aponeurosis (which is why the bottom of the foot is not bony) but we can really see much of their definition.

There are muscles on the dorsal side of the foot as well, but only a small portion of one of them shows clearly on the surface. More on that later. Most of what we can feel on the dorsal side of the foot is bone, and most of what we can see are tendons. The number of tendons we see depends on the position of the foot, but it ranges from one to seven. And there are a few other nice ones on the laterial and posterior sides of the ankle as well. How are there so many visible tendons on the foot ankle if we see so few muscles? Because the tendons we can see there come from muscles that are up higher, usually somewhere on the lower leg.


One of the easiest sets of muscle tendons to identify on the dorsal foot are those of extensor digitorum longus. That name means "long extensor of the digits." This muscle has four tendons, one each that inserts onto toes 2 through 5 and extends them. (Extension of the toes is kind of like curling them upward.) These tendons stand out clearly, sometimes even when the toes aren't extended. Sometimes we can also see the single extensor digitorum longus tendon up higher on the ankle-- before it has split into four separate tendons.

The presence of the word longus in a muscle name implies that there's a brevis, or shorter counterpart. (Brevis is Latin for "short" and it's the root of the English word "brief." We'll look at the extensor digitorum brevis muscle a little later.

(By the way, there is also a finger extensor in the forearm called extensor digitorum-- digitorum can be fingers or toes-- but there is no need for a longus or brevis qualifier in this name because there is only one extensor digitorum muscle up there.)

Another tendon that is easy to locate is that of the extensor hallucis longus muscle. Digiti hallicus is the Latin name for toe number 1 (or the big toe) so muscles that move it around often have the word hallucis in their names. The extensor hallicus longus tendon is also easy to find, as it insert on the dorsal side of the big toe and extends it upward. Like the other foot tendons, the muscle from which the extensor hallucis longus tendon originates is up on the lower leg. But the tendon can be seen surfacing anywhere from the anterior ankle all the way down to just before the big toe. The point at which it appears depends on the position of the big toe; the more it's extended, the more of the extensor hallucis longus muscle is visible.

Another visible tendon on the dorsal foot is that of tibialis anterior. It's easy to confuse the tibialis anterior tendon with the extensor hallucis longus tendon because they run side by side on the anterior ankle. What tends to confuse things more is the fact that the tibialis anterior tendon sometimes becomes less visible on the surface right at the point at which the extensor hallucis longus tendon begins to emerge! So we tend to see the end of one tendon and the beginning of another as just one long tendon. This is one of the most common mistakes made when drawing the feet.

In the image on the left, we can see both the tibialis anterior tendon and the extensor hallucis longus tendon. If they're mistaken for a single tendon, it's often because often tibialis anterior is disappearing just as extensor hallucis longus is emerging.


Below is a photo in which we can see almost all the tendons mentioned so far. In this case we can only see three of the four extensor digitorum longus tendons. The tendon that goes to the second digit tends to show less often than the other three (although I've included a leader line showing where it would be.) Notice also that the diameter of the tibialis anterior tendon much greater than that of the extensor hallucis longus tendon, and that, as mentioned above, the tibialis anterior tendon submerges and disappears just as the extensor hallucis longus tendon surfaces. We can also just barely see the great saphenous vein, which runs very superficially, just anterior to the medial malleolus of the tibia (which is the bony lump on the medial side of the ankle.)


Despite the great number of tendons dominating the landscape of the dorsal foot, one small muscle manages to peek through them. The extensor digitorum brevis muscle, as its name implies, is the shorter extensor muscle of the toes. It's so short, in fact, that the whole structure fits on top of the foot. It lies just deep to the tendons of extensor digitorum longus, and only the lateral most part of it shows on the surface.  


The extensor digitorum brevis muscle appears as a little lump just distal to the lateral malleolus of the fibula. In fact, it sometimes looks like another malleolus. But one gentle touch will tell you it's soft muscle tissue, not bone. I'm not sure its lovely shape would quite have inspired Elizabeth Barrett Browning, but it adds, in its own odd way, a depth and breadth and height to the poetry of the human foot.


Thank you to my foot models. If you have requests for upcoming posts, I'm always happy to take suggestions!


Sunday, May 29, 2011

The External Ear: Shhh, I'm Listening to Reason!

It stands to reason that a structure's design enhances its function. It stands to reason that its size, shape and materials best suit that function. It stands to reason that, in multiples, that structure has latitude for variability while maintaining the same basic parts. And maybe most of all, it stands to reason that the best examples of such a design would be found on the human body.

While most any anatomical structure could provide a satisfying conclusion to this goofy little rumination, I think one of the most interesting and unique examples is the lovely, complex, variable yet constant structure of the human external ear.


When learning to draw any part of the human body, we're taught, of course, to remember what must always be shown, what is constant. But learning those things shouldn't come at the cost of remembering the variations, the ways in which these structures may differ from person to person. While most human ears can be drawn with the same basic parts and pieces, the relative sizes of and relationships among those pieces can vary a great deal. Drawing the ear becomes much easier (and a lot more interesting) when we remember both the constants and the variables. 

The ear is constructed of an outer rim, the helix, and an inner rim, the antihelix. These two structures form sort of an oblong bowl shape. The bottom of that bowl is the concha; this is the deepest point before we get to the external auditory meatus, the opening in the temporal bone that leads to the middle and inner ear structures. On the anterior side of the ear, there is a small notch (the anterior notch) which lies above the tragus, a small flap of cartilage. One of the most common mistakes in rendering the ear is drawing a connection between the helix and the anterior notch. They don't connect there, but it seems their proximity to one another makes us think they should. The difference can be seen in the illustrations below.


The helix actually arises on its leg from the bottom of the concha, usually very gradually. Then it encircles the entire ear and end at the very bottom, at the lobe. The antihelix appear to emerge from underneath the upper portion of the helix, on two legs. Those legs merge together and the antihelix curves around posteriorly as a single unit until it ends at the antitragus (just opposite the tragus, which is what the name antitragus means.)


In addition to names for external ear structures, we also have names for the spaces and depressions among them. We have the intertragical notch, which is the small notch between the tragus and antitragus. We have the scapha, which is the long valley between the helix and the antihelix. And we have the triangular fossa, which is the depression between the two legs of the antihelix.

By the way, scapha is Latin for boat, and it seems that anatomical structures with a depressed center (like a boat) often have this name or some variant of it. We have a scaphoid bone in our wrist which has a depressed shape. Navicular means the same thing, and we have a navicular bone in our foot that also has a depressed shape.

Most of the above mentioned structures are composed of cartilage, which is the ideal material for the human external ear, as it's flexible but it holds its shape. If it were entirely skin and fatty tissue, it would flop over on itself and lose its satellite dish shape that draws sound waves into the auditory meatus. On the other hand, if the external ear was made of bone, it would hold its shape but it would break easily. So most of the external structure is composed of cartilage, although the lobe is mostly fatty tissue, which is why it's floppier than the rest of the ear.

One of the most noticeable variations in external ear anatomy is that of free lobes vs. attached lobes. This is a genetic trait. Although there's not 100% consensus, it's widely believed that attached earlobes are the recessive trait. If you have attached lobes, this means you most likely have two recessive alleles for it.


Another variation among ears is the depths of the sunken areas. The concha, scapha, and triangular fossa range from very shallow to very deep. In addition, the intertragical notch (the small notch between the tragus and the antitragus) varies somewhat in width from one individual to the next.


I would also like to write about rendering the ear and its shapes from a variety of other angles, but this post has gone on long enough! Shall we save it for another day?

It also stands to reason that my lovely ear models deserve a load of thanks! They include family members, neighbors and students: Daniel, Henry B., Henry G, Hillary, Jeff, Nick, Sean, Stephanie, Theresa, and Thomas.

Sunday, May 15, 2011

The Anterior Neck: Theme and Variations

It's difficult to prescribe one exact way to draw the anterior neck because its surface appearance depends on so many variables. Superficial anatomical structures and their degree of visibility change with head position, facial expression, age, body type, and even the level of physical exertion. Today we'll look at these structures and discuss the conditions that affect their visibility.

Typically the easiest landmark to identify first is the jugular notch (a.k.a. suprasternal notch), a small divot on the superior surface of the manubrium of the sternum. On either side of the jugular notch, you will probably see origin tendons of the sternocleidomastoid muscle, as well as the medial ends of each clavicle. One common problem in figure drawings is a jugular notch shown flowing directly into the clavicles. We tend to draw it this way because we know the clavicles connect directly to the manubrium-- but we tend to forget that you can't really see that connection on the surface. Why can't we see it? Because the origin end of the sternocleidomastoid muscle attaches to the manubrium and to the medial ends of the clavicles, and this attachment obscures the connection between the manubrium and the clavicles. The paintings below show the difference.


While the origin end of the sternocleidomastoid muscle (particularly the manubrial attachment) is usually visible as a surface landmark, whether we can see the rest of the muscle depends primarily on head position. We know from its name that sternocleidomastoid originates on the sternum (sterno) and the clavicle (cleido) and inserts on the mastoid process of the temporal bone (mastoid) which is the bony bump you can feel just behind your ear. So if the entire sternocleidomastoid muscle shows, you'll see its split origin end come from the manubrium and the clavicle, you'll see it merge together as it extends superiorly, and finally you'll see it attach just behind the ear. Just behind the ear-- not way behind the ear or under the ear or in front of the ear, all common mistakes in head and neck drawing.

But how do we know whether or not to show the entire sternocleidomastoid muscle? It's also a common mistake to render both sternocleidomastoids from end to end no matter the head position. But the sternocleidomastoid muscles don't always show in their entirity. When they're not in use, the most we'll usually see of them are their manubrial attachments on either side of the jugular notch.

The sternocleidomastoids (herein referred to as SCMs) do show, however, when they're being used, and they have two uses. First, when the SCMs are used together, they hold the head in position when the torso is tilted backward. In other words, you can lean your body backward without your whole head flopping backward because your SCMs, when working together, hold your head in place over the torso. This is shown in the photo below of my lovely neighbor Stephanie.


When used separately, the sternocleidomastoid muscles have another function; they turn the head to the left or to the right. We use the left SCM to turn the head right, and we use the right SCM to turn the head left. As such, if the head is turned to the right, only the left sternocleidomastoid shows, and vice versa. The photo below shows Stephanie with her head turned to her left, so only her right SCM is showing from end to end. The left one is showing, but only at its manubrial attachment.


The SCMs create a sort of V shape on the anterior neck, and there are two more structures inside this V that can often be observed on the surface: First, we have two long thin sternohyoid muscles. As their name suggests, the sternohyoids originate on the sternum (the superior edge of it), extend upward, and insert onto the hyoid bone, a small horseshoe shaped bone in the anterior neck. You can't see the hyoid bone on the surface, but you can just barely feel it if you really dig your fingers into your neck just below the mandible until you're going "gagghhh!"

The sternohyoids run almost parallel, but not quite; they are slightly closer together at their insertion end than at their origin end, as you can see in the photo and illustration below. You usually can't see the sternohyoids in young people, but they begin to appear on the surface in one's 40s. Often neck structures are more visible in older age because fat tissue in the neck dissipates and the skin gets thinner. And often the skin on the neck follows the shape of the sternohyoids more and more with advanced age. So very old individuals will have two long folds down the anterior neck that run right along the sternohyoids.


In between the sternohyoid muscles is another structure that is usually visible on the surface-- the thyroid cartilage, colloquially known as the Adam's apple. The thyroid cartilage is part of the trachea, a cylindrical structure through which air travels from the throat into the lungs. The trachea is made up of a series of cartilaginous rings, bound together by connective tissue. The thyroid cartilage is the most superior ring of tracheal cartilage. It is much larger and more prominent than the rest, and as such, tends to poke out through the neck.

The ring of thyroid cartilage houses the larynx, in which our vocal chords are found. Men typically have deeper voices than women because they have larger larynges and larger vocal chords. This means they also have a larger thyroid cartilage in which to house them. This is why the thyroid cartilage is generally much more visible on a man's neck than on a woman's.

Just below the thyroid cartilage, there is another ring called the cricoid cartilage. This is not as large or prominent as the thyroid cartilage, but it can often be seen on the surface as well.

When observing the anterior neck you might also see the external jugular veins, bilateral vessels that return blood from the head to the heart. In certain situations you might see them popping out on the neck. Each one runs right over the SCM at an oblique angle to it. There's usually no need to show them in a drawing, though, unless your subject is exerting a great deal of physical energy (or is just really mad!)

There is another very thin anterior neck muscle that lies superficial to all of this-- the platysma! But its appearance is fleeting, and I've rambled on long enough now, so we'll leave that for another day.

Bonus question: As I mentioned above, the sternal/clavicular end of the sternocleidomastoid muscle is its origin. The mastoid process of the temporal bone is its insertion. Does anyone know how we know this for sure? If so, post below!

Tuesday, May 3, 2011

The Ventral Forearm: What are those Tendons?


While the ventral side of the forearm is not exactly less complicated than the dorsal side, it appears less complicated on the surface because so few of its structures show clearly on the surface of the body. Compared to the dorsal side of the forearm, the ventral surface is smooth and uncomplicated. The ventral side of a vertebrate is generally considered its "underbelly"-- paler and less hairy than its dorsal counterpart because of fewer hair follicles and less melanin production.

But the distal end of the ventral forearm (the end closest to the wrist) does have a few prominent surface landmarks. I write "a few" instead of a specific number because the number depends on the individual; one of the tendons that's often seen at this location comes from a muscle that is actually missing in 12-15% of the human population! And, if that muscle and tendon are missing, some deeper tendons may or may not show!

Let's back up a little. In most cases, there are two fairly visible tendons down the approximate center of the ventral wrist. (Their degree of visibility also depends on genetics, hand position, and temporary body variations such as those seen in water retention.) Those two tendons come from the palmaris longus muscle and the flexor carpi radialis muscle. They are shown in the illustration below. We can tell this is a ventral view of the forearm because we can see the palmar aponeurosis (a thin, tendinous sheath that is only on the palmar side of the hand) and because, um... there are no fingernails!


If both the flexor carpi radialis tendon and the palmaris long tendon are visible, it's easy to tell one from the other; the flexor carpi radialis tendon is more toward the radial (thumb) side of the arm, as its name implies. Once that's been established, one can deduce that the other tendon is most likely that of palmaris longus.

The palmaris longus tendon is also more superficial than the flexor carpi radialis tendon because it runs outside the annular ligament, while all the other wrist tendons run deep to it. The annular ligament is a ring-like ligament ("annular" is Latin for "ring-like") that wraps around the wrist like a bracelet and retains the position of the tendons that run from the forearm and into the hand. After surpassing the annular ligament, the palmaris longus tendon inserts directly into the palmar aponeurosis and tenses it to help strengthen the grip.

In some cases, one or both of these tendons are difficult to see, especially when the hand is relaxed. Because both of these muscles are flexors, you can force them to stand out more by flexing the wrist and tensing the hand into sort of a claw shape.

In the photo below, you can easily see both ventral forearm tendons and tell them apart. First of all, flexor carpi radialis is the more radial of the two (meaning it is closer to the thumb side.) Second, palmaris longus can be seen more clearly where the wrist meets the hand, because at that point, flexor carpi radialis is traveling under the annular ligament and palmaris longus is not.


But because palmaris longus is missing in 12 to 15% of the human population, we must also consider what the wrist looks like if there is no palmaris longus muscle. If the palmaris longus muscle is missing, you can usually still see the tendon of flexor carpi radialis. Ulnar to that, where the palmaris longus tendon would normally be seen, you might see nothing but smooth skin. Or you may see some less pronounced tendons, which would most likely be those of flexor digitorum superficialis, which lies deep to everything we've talked about so far. Flexor digitorum superficialis is Latin for "superficial flexor of the fingers," which implies there is also a deep flexor of the fingers (flexor digitorum profundus.) But that muscle is very deep and there is usually no evidence of it on the surface.

In my Anatomy class at the American Academy of Art in Chicago, we always end week 11 ("forearm week") with all my students making claw hands and checking to see whether they have the palmaris longus muscle. As expected, most students have it, a few don't, and occasionally one or two have palmaris longus in one forearm but not the other. But there is one occurrance of which I've found I can be almost 100% sure: Those students who do not have the palmaris longus tendon always seem bothered by this fact, and some actually refer to themselves as freaks! Let's make this clear once and for all: You are not a freak if you don't have the palmaris longus muscle! Distinctive, yes, but not a freak.

Do you have the palmaris longus muscle? See if you can tell and let me know. I welcome your photos, comments, and questions!

Until next time,
Kristin